Loading your container perfectly onto its trailer is one of the things you must understand to benefit from your equipment and vehicles.
Therefore, operations should be made following standard procedures that enhance safety at all times during loading, transportation and offloading at site and/or destination.
Essentially, there are 3 different ways of loading your container onto a trailer as will be discussed here, three Ways to Load a Container on Trailer when you don‘t have a container crane in your workshop:
Get Detailed Specifications!
1. Using Container Tilt Trailer, Which Can Load By Self
The container tilt trailer structure is designed in a way that facilitates self-loading of containers on its trailer bed. The apparatus installed on it simplifies the procedure for loading containers on it.
Typically, the trailer has lower and upper arms that are attached via a pivot device. Its designed for easy loading and offloading of containers and would not need the use of a crane.
The upper platform is hydraulically controlled to enhance lifting operations.
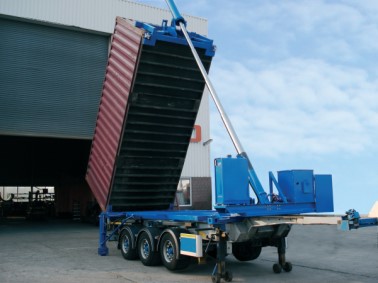
Container Tilt Trailer
Though an expensive option, you will not have to worry about the loading requirements due to the convenience that it gives you.
The upper frame comes with a roller installed at some distance from the pivot device and perfectly attaches it to the frame below.
The roller works by rotating around the point of mounting at the upper frame. In this arrangement, the roller can move over the upper frame with respect to the lower one.
There is also an extension arm that is longitudinally contractible that helps in managing the weight of the container. Most important to note is that the extension arms can extend outwardly and make possible the offloading process as well.
The pivotal drive through the upper frame contributes to a change in the separation distance between the roller and the cable securement point with respect to the lower frame and the change in the distance between the cable securement point and the roller with respect to the container structure.
This makes it possible to attain the movement and lift for the container without the need for external force or power to change the cable distance.
It is also important to note that the lower frame is pivotally attached with respect to the body of the trailer to facilitate a dumping operation.
This can be attained by moving about the point where it is hinged on the lower frame rather than the upper frame during such an operation.
Remember that this is only applicable when doing a dumping procedure.
When the trailer’s lower frame is fit with respect to the trailer body, the pivotal movement triggered on the upper frame about the hinging point axis will produce a loading or an offloading position as needed.
Get Detailed Specifications!
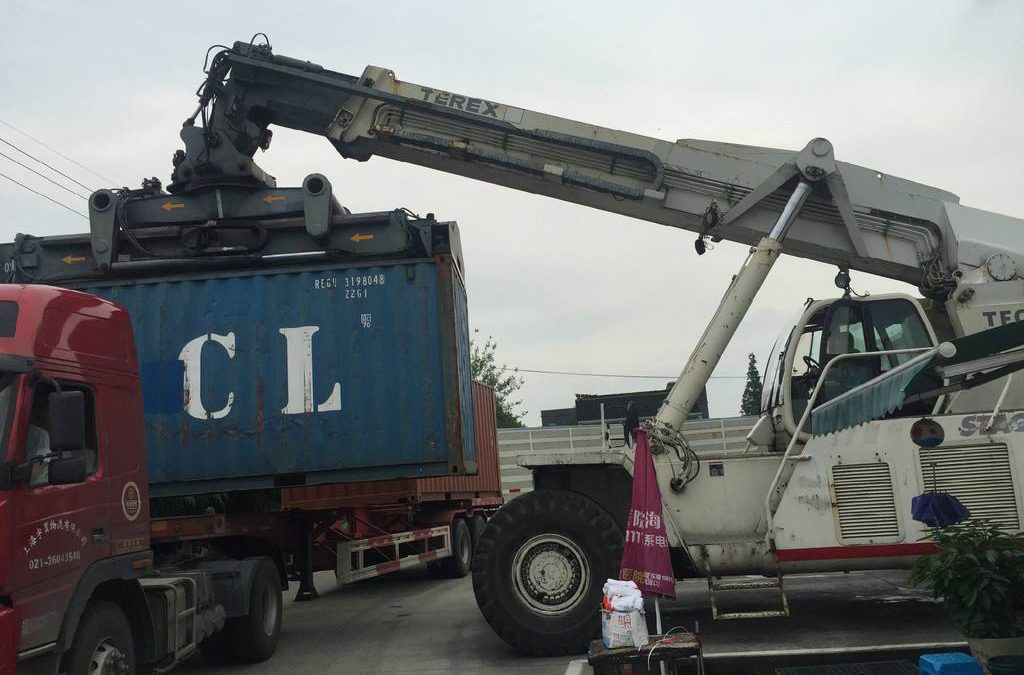
2. Using a Container Side Lifter Trailer
A container can also be loaded onto a trailer through a side lifter. This is made possible through the following features:
- Lifting cranes. Commonly known as crane modules are cranes powered through a hydraulic system that help in lifting a container off the ground or from another vehicle onto a trailer. With this setup, container lifting can be achieved on and off the chassis. The cranes are usually located on top of the side lifter chassis and are normally able to move along the trailer chassis that gets shifted via hydraulic actuators to handle different container lengths.
- Driving Power Unit. In a typical set up, the cranes get powered via a fuel engine. However, the case is different for these cranes that get powered via a PTO from the trailer.
- Legs for stability. Hydraulically controlled legs are also available to help in lifting your fully loaded container and keep the trailer in position. With this feature, it is unlikely that your vehicle will tilt. You can adjust these legs to help in your operations especially when working on a bumpy surface. This way, you will enhance greater safety margins and load limits when placing the container on top of the trailer. Still, the legs can be tilted and extended to offer additional capabilities when the containers get lifted off confined areas especially on trailer decks.
- Chains. There usually are various chains attached from the upper section of the trailer’s cranes all the way to the corner castings located at the base of the container when doing a lift operation. The trailer comes with a special connecting feature that is usually position between 20ft containers to facilitate locking together two containers of this size. This way, it will be as though you are carrying a 40ft container altogether.
- Tractor/cab. This is what is used for pulling the trailer. It can also be used at times to supply power through the PTO. Additionally, it can provide compressed air for the trailer brakes for the side lifter wheels. Normally, the side lifter cannot be operated unless you have already connected it to the cab. This happens so due to the fact that even with the carrying of the power pack by the side lifter, the cab offers the much-required compressed air for use on the brakes of the trailer and again for additional stability in the process of doing a lift.
- Chassis. The chassis is a very important feature as it manages the container’s weight and at the same time offers support for the cranes.
- Remote control feature. This device is operated with the use of joysticks and buttons. Ideally, they are attached via a multi-pair electric wire or via a radio signal. This allows the movement of the container and provide a view from various angles as it is being lifted and loaded on the trailer.
Container transfer: Using the above-named features, the container now gets transferred from the side lifter to skeletal trailer. The stabilizers get extended to provide enough room for the trailer to get back into position when loading the container.
Otherwise, the stabilizers can be allowed to lie low after the skeletal trailer has been positioned on the way. Usually, the maximum clearance is only 300mm on each side of the trailer used for transferring the container.
In this kind of setup and operation, the turnaround time is usually faster right from the start to the end. The procedure is also quicker even at times when the side lifter is already carrying a container on it.
The container can be transferred directly onto a quad axle trailer connected to a 4-axle tractor which will not require you to jack knife the next truck and the quad axle trailer.
The most important thing is that, the lift modules don’t have to put the stabilizer legs on the next trailer to gain stability. The side lifter for the containers can handle height sizes of 9’6’.
Get Detailed Specifications!
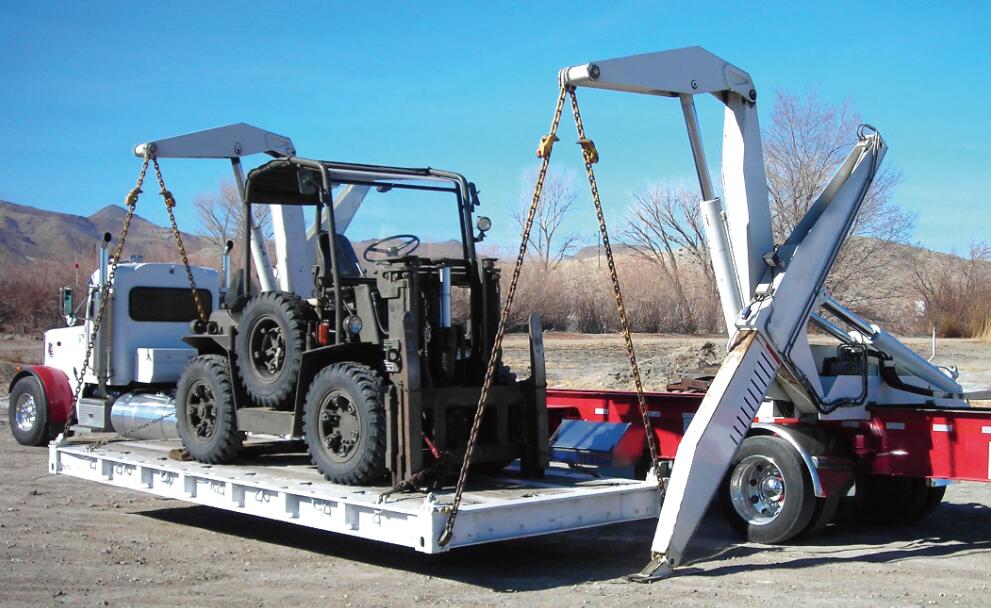
3. Using Container Lift fork
One of the commonly used vehicle or equipment in loading containers on a trailer is the lift fork. This is a very powerful tool that makes it possible for an individual to precisely lift a container, move it and place it on a trailer bed without much effort.
When done in the right manner, a lift fork can help a lot in managing the weight of containers and reduce the chances of causing injuries in trying to manage that load through other means.
To ensure successful lift fork operations, make sure the operator:
- Is trained on the basic working principles of lift forks when handling loads
- Knows how to operate that particular lift fork
- Is aware of all the safety measures taken upon when working with a lift fork
- Checks to ensure that the lift fork is well maintained and that it has all parts in place and working properly.

Safety features of a Lift Fork
A lift fork has a backrest extension on its forks that help in prevent part of the container from falling backwards to the side of the operator.
This is much needed when containers are lifted high and especially because a bigger part of the container would be allowed to fall to the back in instances of acceleration, sudden halts or driving on a bumpy ground.
The lift fork also comes with an overhead guard to prevent your container from falling onto the operator as they pick or place it at elevation.
However, remember that the guard is not meant to take impact coming from full container load. Its efficiency is meant for deflecting small packages.
This is a requirement for all lift forks that lift loads over the operator except for conditions where clearances cannot allow the tool to be applied.
Operator restraints are useful in holding the driver down in the seat should they strike an object or should there be an overturning of the lift fork.
When a lift fork starts to overturn, the safest thing is to stay on the seat and hold on strongly while leaning on the exact opposite direction of the anticipated fall.
The operator should not try to jump off. Many fatal accidents have happened when the operator chose to jump off the lift fork. When the lift fork starts to tilt, it moves slowly in a way that makes the operator think that they could afford to jump off.
When the center of gravity goes past the line of the wheel, the lift fork will fall rapidly. The overhead guard of the lift fork will drastically crush or pin on any operator who tries to jump.
Make sure that the operator makes use of a lap bar, seat belt or any other restraint installed in the lift fork!
After loading a container on a trailer, how to fasten the containers?
4. Fastening Containers on the Tractor Trailers
Once a container has been loaded onto a trailer, fastening is required. You need to secure your container on the trailer bed through standardized twist locks, for instance.
You will realize that each corner of every container you will come across has a socket having various slotted holes with one facing the downward direction.
On the other hand, the truck usually has a number of fat, stubby oval pins set into it. The pins are normally of a retractable construction or can be pushed above the trailer bed by about 4”. The pins normally have two sections set on a vertical trough.
You will find a number of sets in some trailers to allow for an accurate position of various loads.
These include 1×20” located in the center of a long trailer, 2×20” containers or just 1×40” container where each of them uses different configurations for the pins.
Before you can drop your container on the trailer, 4 twistlocks get pushed up by the operator. This leaves a pin protruding vertically out below each of the container’s corners.
The pin handle is normally turned and that turning rotates a shaft that passes up via the frame. This turns the top inch or thereabouts of the oval pin through an angle of 90deg.
The rotated tops then stop your container from getting lifted more than just few millimeters off the trailer.
The twistlocks may appear small but they work well to hold the container in position. They are not visible during transportation since they are hidden by the container. With the shaft, it offers a secure lock of the container.
Conclusion
Shipping containers are usually very heavy and a normally loaded on trailers using specialized systems and equipment.
Some of the loading can be done through external equipment independent of the trailer while others can be loaded via systems that are part of the trailer hence no need of external equipment for loading.
Described in here are three ways of loading shipping containers onto a trailer. It is important to work with trained operators in order to safely load a shipping container onto a trailer.
This helps in safeguarding the contents and/or the cargo contained in them while at the same time helping in reducing accidents during operations.
The type of trailer you choose in the transportation of your shipping containers will largely determine the type of loading to be conducted.
There are those trailers without inbuilt loading systems. These are usually loaded using a lift fork. However, if you are using a side lift trailer or tilt trailer, your container will be safely loaded on the trailer via hydraulically controlled in-built systems.